Single server: upgrade
A single server installation is being considered a non-production installation. For a production installation some kind of orchestration should be applied. A single server installation of FOLIO is useful for demo and testing purposes.
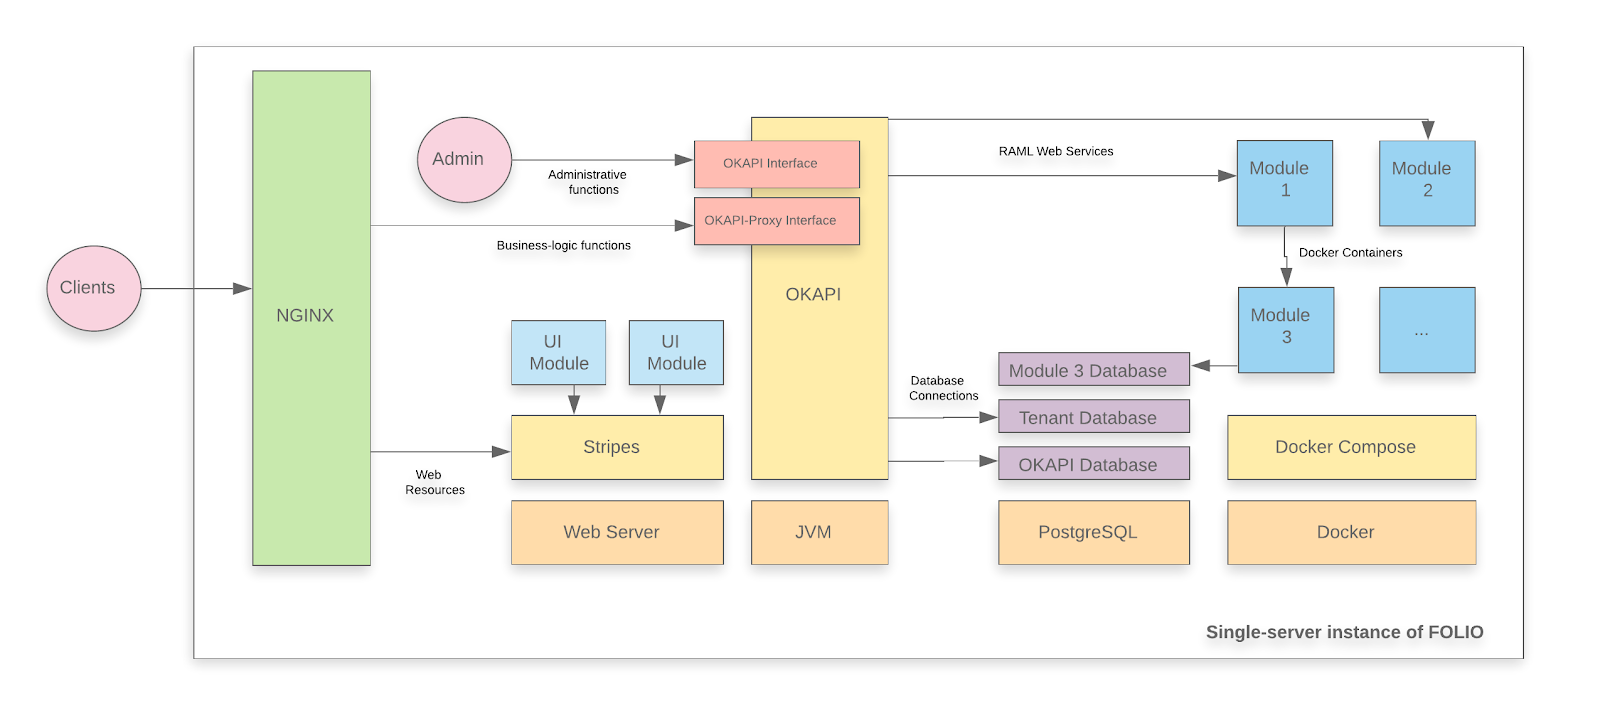
A FOLIO instance is divided into two main components. The first component is Okapi, the gateway. The second component is the UI layer which is called Stripes. The single server with containers installation method will install both.
Upgrade-based installation
This is a documentation for an upgrade of your FOLIO system.
-
It assumes that you have already successfully installed a FOLIO system and now want to upgrade your system to Nolana.
-
If you are deploying FOLIO for the first time, or if you want to start with a fresh installation for whatever reasons, see how to do a fresh installation of a single server deployment.
-
This documentation shows how to upgrade to a platform-complete distribution of Nolana.
-
Throughout this documentation, the sample tenant “diku” will be used. Replace with the name of your tenant, as appropriate.
System requirements
Software requirements
| Requirement | Recommended Version |
|---|---|
| Operating system | Ubuntu 22.04.3 LTS (Jammy) 64-bits |
| FOLIO system | Morning Glory (R2-2022) |
Hardware requirements
| Requirement | FOLIO Extended Apps |
|---|---|
| RAM | 40GB |
| CPU | 8 |
| HD | 350 GB SSD |
I. Before the Upgrade
First do a snapshot of your system, so you will be able to replay the current status in case the upgrade fails.
First do Ubuntu Updates & Upgrades
sudo apt-get update
sudo apt-get upgrade
sudo reboot
Check if all Services have been restarted after reboot: Okapi, postgres, docker, the docker containers (do: docker ps –all | more ) , Stripes and nginx.
Read carefully the Nolana Release Notes. Do these actions:
i. Permissions, Tenant
Permission ui-tenant-settings.settings.enabled - display name “Settings (Tenant): View” has been made invisible. Recommend removing “Settings (Tenant): View” from any users prior to upgrading to Nolana. You can also remove the permissions after upgrade by enabling Settings > Developer > Configuration > List invisible permissions in add perm menus and then editing the relevant user records.
ii. Data Import & Inventory
Update to the default MARC Bib-to-Inventory Instance MAP: Existing mapping for 590 (Local note) updated so that 1st indicator = 0 triggers “Staff only” indication. Any other 1st indicator does not. If you would like to review the mapping change first, go to https://github.com/folio-org/mod-source-record-manager/blob/master/mod-source-record-manager-server/src/main/resources/rules/marc_bib_rules.json and search for 590. Review that section of the rules, and then if that handling is wanted for a particular library tenant, add that section to their equivalent map. Follow the instruction to update the rules.
More preparatory steps
There might be more preparatory steps that you need to take for your installation. If you are unsure what other steps you might need to take, study carefully the Release Notes. Do all actions in the column “Action required”, as appropriate for your installation.
II. Reinstall the Backend, Migrate from Morning Glory to Nolana
II.i) Fetch a new version of platform-complete
Fetch the new release version of platform-complete, change into that directory:
cd platform-complete
git fetch
There is a branch R3-2022-hotfix-1. We will deploy this version. Check out this Branch. Stash local changes. This should only pertain to stripes.config.js . Discard any changes which you might have made on the install-jsons:
git restore install.json
git restore okapi-install.json
git restore stripes-install.json
git restore package.json

git stash save
git checkout master
git pull
git checkout R3-2022-hotfix-1
git stash pop
II.ii) Upgrade Okapi
Upgrade the Okapi version and restart Okapi. Read the Nolana Okapi version from install.json: okapi-4.14.12
Update the Okapi Debian package. Use the “focal” distribution also for Ubuntu jammy:
sudo add-apt-repository "deb https://repository.folio.org/packages/ubuntu focal/"
sudo apt-get update
sudo apt-get -y --allow-change-held-packages install okapi=4.14.12-1
Check Okapi logging properties in /etc/folio/okapi. Check that this line is in okapi.conf:
log4j_config="/etc/folio/okapi/log4j2.properties"
Edit log4j2.properties. Make sure Okapi logs into a file and define a RollingFileAppender.
Restart Okapi:
sudo systemctl daemon-reload
sudo systemctl restart okapi.service
Follow /var/log/folio/okapi/okapi.log .
Now Okapi will re-start your modules. Follow the okapi.log. It will run for 5 minutes or so until all modules are up again. Check if all modules are running:
docker ps --all | grep "mod-" | wc
  65
The above number applies if you had installed a complete platform of Morning Glory.
Retrieve the list of modules which are now being enabled for your tenant (just for your information):
curl -w '\n' -XGET http://localhost:9130/_/proxy/tenants/diku/modules
...
}, {
  "id" : "okapi-4.14.12"
} ]
If you are starting with a complete platform of Morning Glory, you will see 9 Edge modules, 57 Frontend modules (folio_*), 65 Backend modules (mod-*) and the Nolana version of Okapi (4.14.12).
II.iii) Pull module descriptors from the central registry
A module descriptor declares the basic module metadata (id, name, etc.), specifies the module’s dependencies on other modules (interface identifiers to be precise), and reports all “provided” interfaces. As part of the continuous integration process, each module descriptor is published to the FOLIO Registry at https://folio-registry.dev.folio.org.
curl -w '\n' -D - -X POST -H "Content-type: application/json" \
  -d '{ "urls": [ "https://folio-registry.dev.folio.org" ]  }' http://localhost:9130/_/proxy/pull/modules
Okapi log should show something like
 INFO  ProxyContext         510602/proxy REQ 127.0.0.1:49950 supertenant POST /_/proxy/pull/modules  okapi-4.14.12
 INFO  PullManager          Remote registry at https://folio-registry.dev.folio.org is version 4.14.12
 INFO  PullManager          pull smart
  ...
 INFO  PullManager          pull: 3653 MDs to insert
 INFO  ProxyContent         510602/proxy RES 200 38836856us okapi-4.14.12 /_/proxy/pull/modules
II.iv) Pre-Upgrade
Check your Okapi environment:
curl -X GET http://localhost:9130/_/env
At this point, (re-)configure the environment variables of your modules, as needed. Study the release notes for any changes in module configurations. Follow these instructions to change the environment variables for a module: Change Environment Variables of a Module.
From Nolana release notes, do these steps:
i. Inventory single record import/quickMarc derive
DB Read/Write split should be disabled for mod-source-record-manager. When mod-source-record-manager is deployed do not pass the environment variables for DB_HOST_READER and DB_PORT_READER (it won’t be enabled by default).
ii. Bulk Edit
For mod-data-export-worker, add LOCAL environment variables discussed here: https://github.com/folio-org/mod-data-export-worker#environment-variables otherwise Bulk Edit file uploads will fail in Folio.
iii. Data Import
Provided script to clean up Job profiles in case linked Mapping or Action profiles were edited. Follow the instructions instructions provided at point 11.
If you are in a multi-tenant environment, set ENV for mod-search and in all other modules that use Kafka (mod-inv/inv-storage/mod-srs/srm, mod-data-import etc…) ENV = nolana . In a single tenant environment, you don’t need to set it . It has the default value ENV = folio.
If you have set ENV = nolana, set KAFKA_EVENTS_CONSUMER_PATTERN for mod-search, using the value of ENV as a part of its value: KAFKA_EVENTS_CONSUMER_PATTERN = (nolana.)(.*.)inventory.(instance|holdings-record|item|bound-with)
If you have set ENV = folio, set KAFKA_EVENTS_CONSUMER_PATTERN = (folio.)(.*.)inventory.(instance|holdings-record|item|bound-with)
II.v) Deploy a new FOLIO backend and enable all modules of the new platform (backend & frontend)
Deploy all backend modules of the new release with a single post to okapi’s install endpoint. This will deploy and enable all new modules. Start with a simulation run:
curl -w '\n' -D - -X POST -H "Content-type: application/json" -d @/usr/folio/platform-complete/install.json http://localhost:9130/_/proxy/tenants/diku/install?simulate=true\&preRelease=false
Then try to run with “deploy=true” like this. Use loadReference%3Dfalse if you have changed reference data to local values in your installation. Use loadReference%3Dtrue if your reference data is in the initial state. If you do loadReference%3Dfalse, new reference data will not be loaded and you will need to load them manually after the upgrade process. If you do loadReference%3Dtrue, your local changes to reference data might become overwritten and you will need to correct them later.
curl -w '\n' -D - -X POST -H "Content-type: application/json" -d @/usr/folio/platform-complete/install.json http://localhost:9130/_/proxy/tenants/diku/install?deploy=true\&preRelease=false\&tenantParameters=loadReference%3Dfalse
This call fails because frontend modules can not be deployed. You will get a message “HTTP 400 - Module folio_developer-6.3.0 has no launchDescriptor”. But this call deploys the backend modules.
You can follow the progress in deployment on the terminal screen and/or in /var/log/folio/okapi/okapi.log .
We finish up by enabeling all modules (backend & frontend) with a single call without deploying any. We don’t load reference data because we are doing a system upgrade (reference data have been loaded before):
curl -w '\n' -D - -X POST -H "Content-type: application/json" -d @/usr/folio/platform-complete/install.json http://localhost:9130/_/proxy/tenants/diku/install?deploy=false\&preRelease=false\&tenantParameters=loadReference%3Dfalse
If that fails, remedy the error cause and try again until the post succeeds. We will take care of old modules that are not needed anymore but are still running (deployed) in the “Clean up” section.
There should now be 125 modules deployed on your single server, try
docker ps --all | grep "mod-" | wc
65 of those modules belong to the Morning Glory release, 62 belong to the Nolana release. 2 modules appear with the same version number in both releases, they have not been deployed twice ( mod-graphql:1.10.2 and mod-licenses:4.2.1 ).
Disable modules which have been removed from the platform (and have not been disabled automatically):
  curl -w '\n' -D - -X POST -H "Content-type: application/json" -d '[{ "id" : "folio_search-5.1.0", "action" : "disable" }]' http://localhost:9130/_/proxy/tenants/diku/install

  curl -w '\n' -D - -X POST -H "Content-type: application/json" -d '[{ "id" : "mod-codex-ekb-1.10.0", "action" : "disable" }]' http://localhost:9130/_/proxy/tenants/diku/install

  curl -w '\n' -D - -X POST -H "Content-type: application/json" -d '[{ "id" : "mod-codex-mux-2.12.0", "action" : "disable" }]' http://localhost:9130/_/proxy/tenants/diku/install
Modules enabled for your tenant are now those of the Nolana release:
curl -w '\n' -XGET http://localhost:9130/_/proxy/tenants/diku/modules | grep id | wc
  131
This number is the sum of the following:
Nolana release:
- 59 Frontend modules
- 9 Edge modules
- 62 Backend modules
- 1 Okapi module (4.14.12)
These are all R3-2022 (Nolana) modules.
Repeat the steps in II.v) for other tenants that you might host on your system and want to migrate now.
II.vi) Cleanup
Clean up. Undeploy all unused containers.
Undeploy 63 modules of the Morning Glory release – all but mod-graphql:1.10.2 and mod-licenses:4.2.1 (these 2 are still in use in Nolana).
Undeploy old module versions like this:
curl -w '\n' -D - -X DELETE http://localhost:9130/_/discovery/modules/mod-agreements-5.2.2
curl -w '\n' -D - -X DELETE http://localhost:9130/_/discovery/modules/mod-audit-2.5.0
...
curl -w '\n' -D - -X DELETE http://localhost:9130/_/discovery/modules/mod-z3950-2.4.0
Remove unused (old) edge modules from Okapi discovery:
curl -w '\n' -D - -X DELETE http://localhost:9130/_/discovery/modules/edge-ncip-1.8.0
curl -w '\n' -D - -X DELETE http://localhost:9130/_/discovery/modules/edge-orders-2.6.3
curl -w '\n' -D - -X DELETE http://localhost:9130/_/discovery/modules/edge-patron-4.9.3
curl -w '\n' -D - -X DELETE http://localhost:9130/_/discovery/modules/edge-rtac-2.5.2
Result
for Nolana HF#1 62 backend modules, “mod-*” are contained in the list install.json. Those 62 backend modules are now being enabled for your tenant(s). 62 containers for those backend modules are running in docker on your system.
Now, finally once again get a list of the deployed backend modules:
curl -w '\n' -D - http://localhost:9130/_/discovery/modules | grep srvcId | grep "mod-" | wc
62
Compare this with the number of your running docker containers:
docker ps --all | grep "mod-" | wc
  62
Perform a health check
curl -w '\n' -XGET http://localhost:9130/_/discovery/health
Is everything OK ?
The backend of the new tenant is ready. Now, you have to set up a new Stripes instance for the frontend of the tenant.
III. Frontend installation : Stripes
Install Stripes and nginx in a Docker container. Use the docker file in platform-complete/docker. Check if everything looks o.k. in platform-complete/docker. If you have successfully installed last time, you should not need to change anything. Just do a “git diff”.
cd ~/platform-complete
git diff
Check if docker/Dockerfile, docker/nginx.conf and stripes.conifg.js look o.k.
Clean up your docker environment:
  sudo su
  docker system prune -a
This will remove stopped containers, unused networks, volumes and images and clear cache.
Build the docker container which will contain Stripes and nginx :
  docker build -f docker/Dockerfile --build-arg OKAPI_URL=http(s)://<YOUR_DOMAIN_NAME>/okapi --build-arg TENANT_ID=diku -t stripes .
Sending build context to Docker daemon  1.138GB
Step 1/19 : FROM node:16-alpine as stripes_build
...
Step 21/21 : ENTRYPOINT ["/usr/bin/entrypoint.sh"]
 ---> Running in af1e52b96681
Removing intermediate container af1e52b96681
 ---> 87cc6173a64f
Successfully built 87cc6173a64f
Successfully tagged stripes:latest
This will run for approximately 10 minutes.
Stop the old Stripes container: docker stop
Start the new stripes container:
Redirect port 80 from the outside to port 80 of the docker container:
nohup docker run -d -p 80:80 stripes
Log in to your frontend: E.g., go to http://<YOUR_HOST_NAME>/ in your browser.
-
Can you see the Nolana modules in Settings - Installation details ?
-
Do you see the right okapi version, 4.12.12-1 ?
-
Does everything look good ?
If so, remove the old stripes container: docker rm <container id of your old stripes container> .
IV. Post Upgrade
From Nolana release notes:
i. Search
Routing was changed to default. All indexes should be recreated. During the upgrade process mod-search indices will need to recreate for both instance and authority as described here.
ii. Permissions, Circulation
With the permission “Settings (Circ): Can view loan history”, the Save button on the Loan anonymization page is no longer visible (UICIRC-767). In addition, a new permission has been created, “Settings (Circ): Can edit loan history”, for which the Save button on the Loan anonymization page is visible and can be selected (UICIRC-766). Update your users' permissions and/or permission sets, as required.
iii. SMTP configuration
SMTP configuration was moved from mod-configuration to mod-email. Read Interesting Information for FOLIO SysAdmins.
Congratulation, your system is ready!
Last modified November 16, 2023